
如何使用MISP的API
Welcome back to this series on using MISP for threat intelligence!
MISP (Malware Information Sharing Platform and Threat Sharing) is an open-source threat intelligence platform that allows you to share, collate, analyze, and distribute threat intelligence. It is used across industries and governments worldwide to share and analyze information about the latest threats. This series aims to give you the knowledge you need to get up and running with MISP as quickly as possible.
If you have followed this series, you will now have events and attributes (IOCs) in your MISP instance and know how to search through them. However, this can be clunky using the MISP web interface. Thankfully, MISP exposes an API we can use to perform any action we can do in the web interface in code!
Today, you learn to use this API to make the most of your MISP instance. You will see how to get statistics about your MISP instance, search for attributes and events, and visualize data you’ve added to your instance.
Let’s jump in and start using the API!
What is an API?
Before looking at MISP’s API, let’s have a quick refresher on what an API is and what it is used for.
An Application Programming Interface (API) is a set of protocols, routines, and tools for building software applications. It defines a set of rules that allow software applications to interact with each other to exchange data and services. They are a bridge between two applications that allows them to communicate with each other in a standard way.
APIs allow developers to access specific functionality or data from a service or application without requiring access to the underlying code. This makes it possible to integrate different software applications, databases, and services and build new applications on top of existing ones.
The most common APIs you are likely to interact with are web APIs, which allow you to interact with a web-based application in a programmable manner. APIs can be public (which anyone can use) or private (which are only accessible by authorized parties). Again, most of the time, you will use APIs requiring some form of authorization (username and password, token, etc.), which is the case with MISP’s API.
The Basics of the MISP API
MISP comes with a RESTful API, which you can use to query your MISP instance for data about itself (e.g., statistics) or data about the intelligence it holds (e.g., events and attributes) using HTTP GET requests. This data is returned to you in either JSON or XML format so you can easily parse it into the form you want to work with. You can also use HTTP POST, PUT, and DELETE requests to add, edit, or remove data from your MISP instance programmatically.
Interacting with your MISP instance through its API saves you from going through MISP’s web interface to retrieve this data and increases the efficiency of your operations through the power of code and automation.
Interacting with the MISP API
To interact with the MISP API, you must add an authentication key to authenticate your application with your MISP instance. You can do this by going to Administration in the top menu and selecting the List Auth Keys dropdown option.
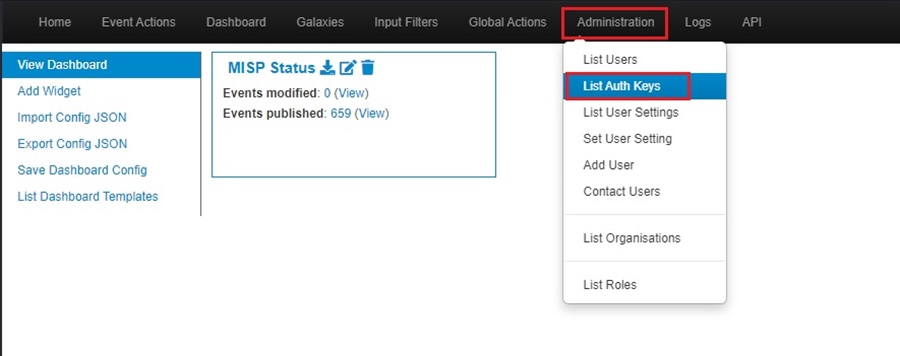
You may not see this option if you do not have the appropriate privileges. To circumvent this, log in as the default admin user.
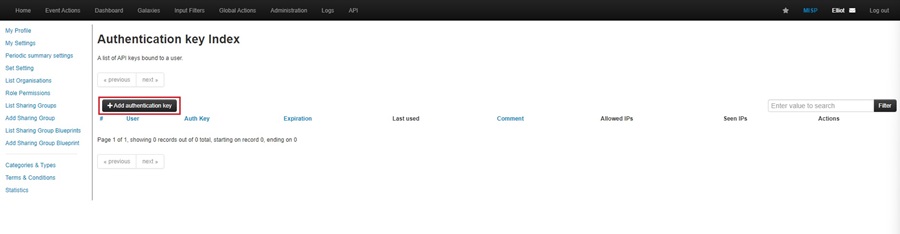
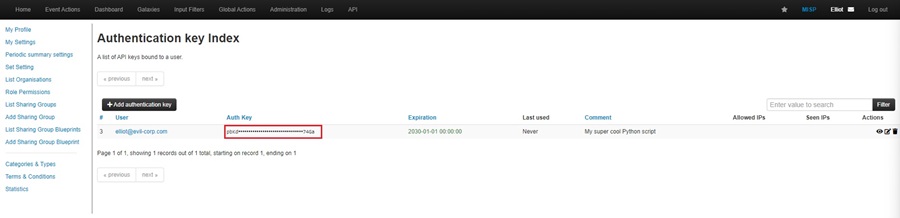
This will bring you to the Authentication Key Index, where you can click the Add authentication key button to create a new API key.
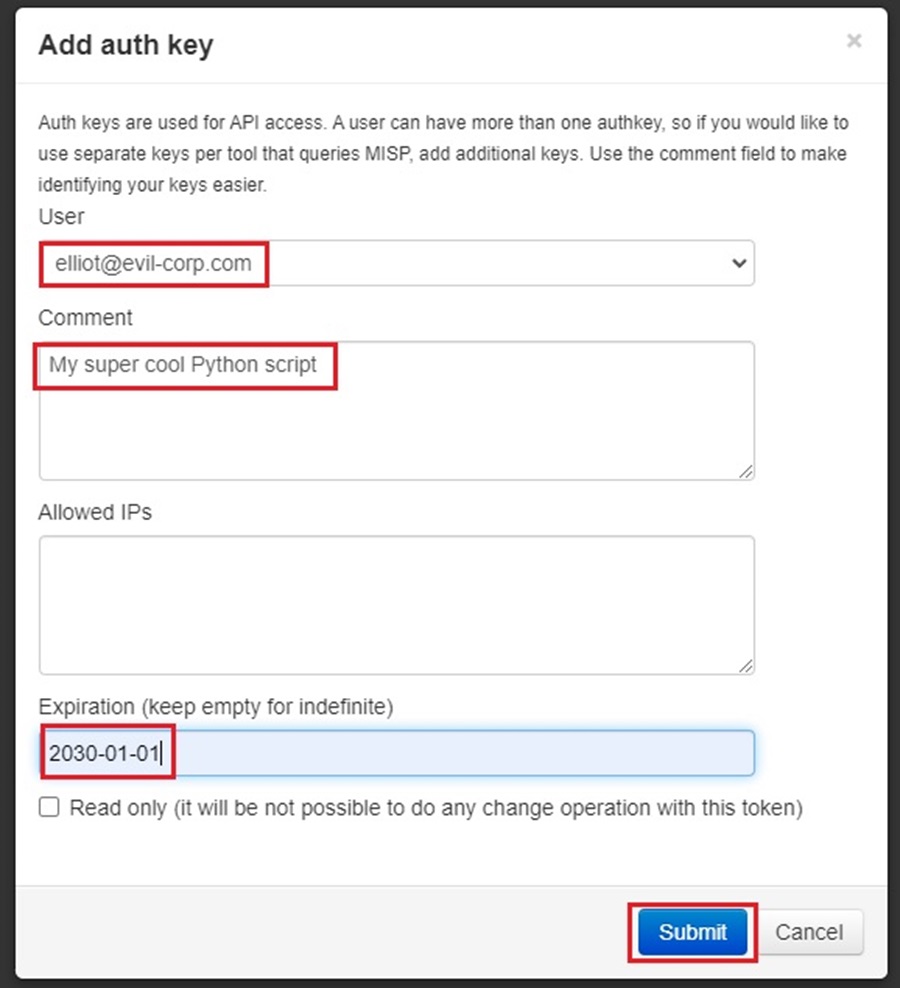
Clicking this button will bring up a popup window for you to fill out the details of the authentication key you are adding. Here, you can select the user account associated with the key, add a comment about what this key is used for, allowlist only specific IP addresses, and add an expiration date. All of these are optional. Click Submit when done.
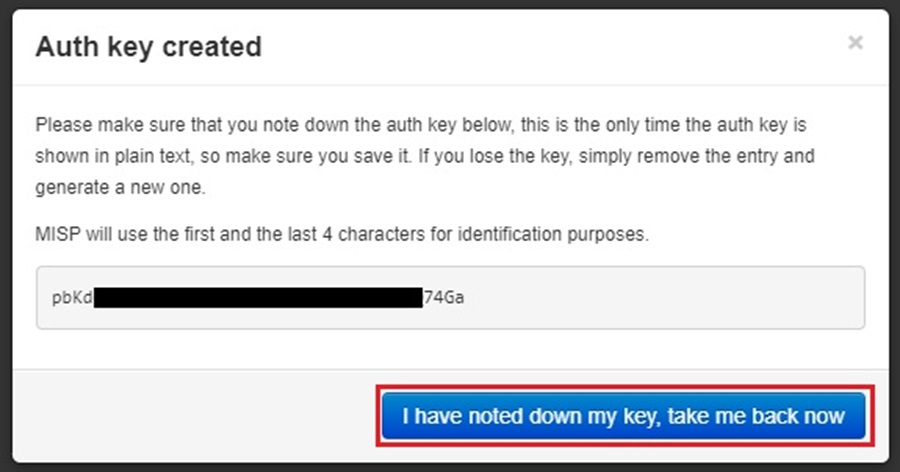
Make sure to save your authentication key in your password manager so you can use it later. This is very important. You won’t be able to see this key again in MISP, and you will have to generate a new one if you forget it. Click the I have noted down my key, take me back now button when done.
You will now see your authentication key appear on the Authentication Key Index page, and you can begin using it!
The Best Way to Use the MISP API
You can interact with the MISP API through direct web requests to the MISP API endpoint. For instance, making a GET request to https://<misp_ip>/events to retrieve information about an event or a POST request to https://<misp_ip>/events/add to add an event. However, if you know a little bit of Python, there is an easier way.
PyMISP is a Python library you can use to access MISP, make API requests, and automatically parse data returned into Python objects so you can manipulate them using standard Python methods and functions. You can install PyMISP using the Python package manager pip with the command pip3 install pymisp or use another installation method detailed on the PyMISP GitHub page.
Once installed, you can use PyMISP to create a Python script that acts as a wrapper for all your MISP API queries, allowing you to perform complex data analysis tasks easily. That said, skip the script. The best way to perform data analysis (and prototyping) is using a Jupyter Notebook.
A Jupyter Notebook can serve two main purposes:
-
Creating a mix of code and Markdown content that serves as “interactive documentation.” A user reads the Markdown content and executes the code as they work their way through the Notebook.
-
For prototyping code that you are building into a larger and more complex tool.
You can use Jupyter Notebooks for prototyping as you interact with the MISP API through Python code. To follow along, see Python Threat Hunting Tools: Part 10 — The Power of Jupyter Notebooks to learn how to create a Jupyter Notebook. Then, use the code examples shown below in your Jupyter Notebook, replacing the variables I use with those of your MISP instance. Add documentation so you remember what each code example does using Markdown cells.
Authentication
You must first authenticate to send API requests to your MISP instance. You need two things to do this:
-
An authentication key to authenticate to the API (as discussed above).
-
The IP address or URL of your MISP instance.
With these in hand, you can use the code below to authenticate to the MISP API using Python:
Python
# import PyMISP object from pymisp Python library
from pymisp import PyMISP
# url or IP address of MISP instance
MISP_URL = '<misp_url>'
# your API authentication key, generated using your MISP instance
MISP_KEY = '<api_key>'
# create MISP instance to interact with using Python methods
misp = PyMISP(MISP_URL, MISP_KEY, ssl=False, debug=False)
You are now ready to begin interacting with the MISP API using Python. Let’s see how to retrieve statistics, search for attributes and events, and visualize data!
The ssl and debug options have been set to false to avoid unnecessary error messages when prototyping.
Retrieving Statistics
You can get data from the MISP API about general statistics, tags, and attributes related to your MISP instance.
General Statistics
To retrieve general statistics, you can use the user_statistics() method associated with the misp object you created when authenticating.
Python
response = misp.user_statistics()This returns a Python dictionary, which you can query for information like total users, events, and attributes.
Python
def general_stats():
  res = misp.user_statistics()
  print(f"Total users: {res['stats']['user_count']}")
  print(f"Total events: {res['stats']['event_count']}")
  print(f"Total attributes: {res['stats']['attribute_count']}")

general_stats()
Tag Statistics
To retrieve tag statistics, you can use the tag_statistics() method associated with the misp object you created.
Python
response = misp.tag_statistics()This returns a Python dictionary which you can query for information based on specific tags.
Python
def tag_stats():
  res = misp.tag_statistics()
  print(f"Total reports: {res['tags']['cssa:origin=report']}")
  print(f"Total investigations: {res['tags']['cssa:origin=manual_investigation']}")
  print(f"Total purple team exercises: {res['tags']['custom:purple-team-exercise']}")

general_stats()
Attribute Statistics
To retrieve statistics about attributes, you can use the attribute_statistics() method associated with the misp object you created.
Python
response = misp.attribute_statistics()This returns a Python dictionary, which you can query for information about specific attributes.
Python
def attribute_stats():
  res = misp.attributes_statistics()
  print(f"Total MD5 hashes: {res['md5']}")
  print(f"Total domains: {res['domains']}")
  print(f"Total IP addresses: {res['ip-dst']}")
  print(f"Total URLs: {res['url']}")
  print(f"Total email addresses: {res['email-src']}")

general_stats()
Searching for Attributes and Events
You can use the MISP API to search for Indicators of Compromise (IOCs) you uploaded to your MISP instance as attributes. Searching for them will return the MISP event they are associated with.
To learn more about attributes and events in MISP, read Threat Intelligence with MISP: Part 3 — Creating Events.
The code below searches for an IOC and uses the misp object’s search() method to query the MISP API for this IOC. MISP will search all the attributes it has stored in its database and return the event an attribute is associated with. The Python code saves the response returned by the API in a dictionary data structure and checks to see if it contains data using an if statement. If it does, this data is parsed using dictionary bracket notation to return key event information that is printed using Python f strings.
Python
IOC = "oxcdntech.com"
response = misp.search(value=IOC)

if response:
    print("--- Matching Event ---")
    print(f"Event ID: {response[0]['Event']['id']}")
    print(f"Event Info: {response[0]['Event']['info']}")
    print(f"Date Added: {response[0]['Event']['date']}")
    print(f"Tags: {response[0]['Event']['date']}")
    for tag in response[0]['Event']['Tag']:
        print(f"- {tag['name']}")
    print("-" * 20)

else:
    print(f"The IOC {IOC} is not in MISP")
The IOC in this example code is a domain name (oxcdntech.com). However, you can change this for any MISP attribute type, such as IP addresses, file hashes, hostnames, email addresses, etc.
The MISP API provides a quick and easy way to search your MISP instance for an IOC without going through the web interface. These searches can also be scripted, automated, and integrated into larger workflows. For instance, you can write a script to check an IOC against your MISP instance, VirusTotal, GreyNoise, and any other threat intelligence source that exposes an API for you to use, allowing you to produce a more complete picture.
Visualizing Data
The examples so far, returning statistics and searching for IOCs, have been basic. Let’s now look at a more complex example of using the MISP API to visualize the most common techniques, tactics, and procedures (TTPs) within your threat intelligence data.
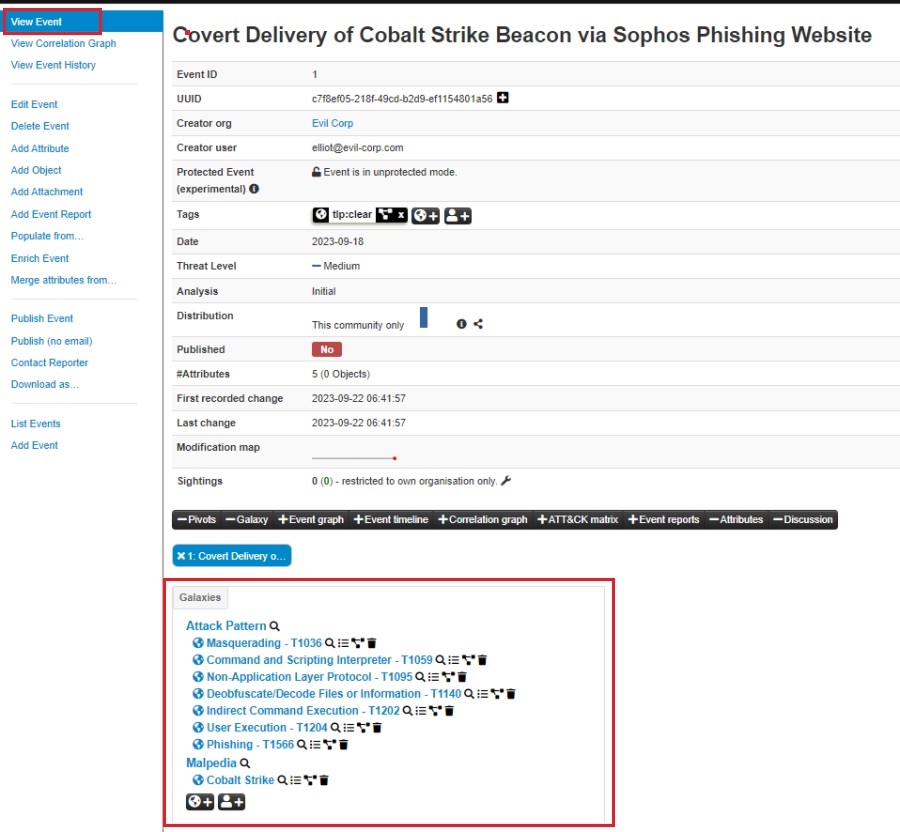
Whenever you upload a new threat intelligence report, incident, or piece of research to MISP, you can include additional context by adding a galaxy cluster on the View Event page. This additional context allows you to use shared threat intelligence frameworks or standardized lingo to describe your event, helping others understand and use it.
Read Threat Intelligence with MISP: Part 3 — Creating Events to learn about galaxy clusters.
Using the Attacker Pattern galaxy (under the mitre-attack), you can add data about the TTPs associated with an event. This is useful because it helps you track how threat actors attack systems and, by extension, how to defend against them.
However, as defenders, our time and resources are usually limited, so we need to prioritize which TTPs we want to focus on defending against. A good starting point is finding what TTPs are most commonly used by threat actors targeting your organization and prioritizing those. You can use the MISP API to automate this by aggregating common TTPs and then visualizing the most common using the pandas Python data analysis library.
This approach is discussed in-depth in Threat Profiling: How to Understand Hackers and Their TTPs, where you can see how to perform common TTP aggregation and visualization manually using a spreadsheet.
The Python code below does the following:
-
Returns all events in your MISP.
-
Creates a Python dictionary containing MITRE ATT&CK TTPs mapped to a count (redacted for brevity).
-
Loops through all events and increases the count of the TTP in the dictionary. It uses dictionary bracket notation to parse galaxy cluster information.
-
Transforms the Python dictionary into a pandas series object.
-
Plots the series object using a horizontal bar graph so you can visualize the data. This code only plots TTPs that have a count greater than 9.
Python
# (1) get all events in MISP instance
all = misp.search(controller="events")
# (2) create dictionary containing MITRE ATT&CK TTPs mapped to a count
ttps = {
  "T1548" : 0,
  ...
  "T1220" : 0,
}

# (3) loop through all events and increase count of a TTP in dictionary if an event has that TTP
for i in all:
    galaxies = i['Event']['Galaxy']
    for j in galaxies:
        if j['type'] == 'mitre-attack-pattern':
            for k in j['GalaxyCluster']:
                ttp = k['meta']['external_id'][0]
                if ttp in ttps:
                    ttps[ttp] += 1

# (4) creating a pandas series object
ttps_data = pd.Series(data=ttps, index=list(ttps.keys()))
# (5) plotting the data in a horizontal bar graph
(ttps_data
    [lambda s: s>9]
    .plot.barh()
)
Once executed, you should see a nicely formatted horizontal bar graph in your Jupyter Notebook. This shows you the most common TTPs and, unlike a spreadsheet, will dynamically change when you add more events to your MISP instance.
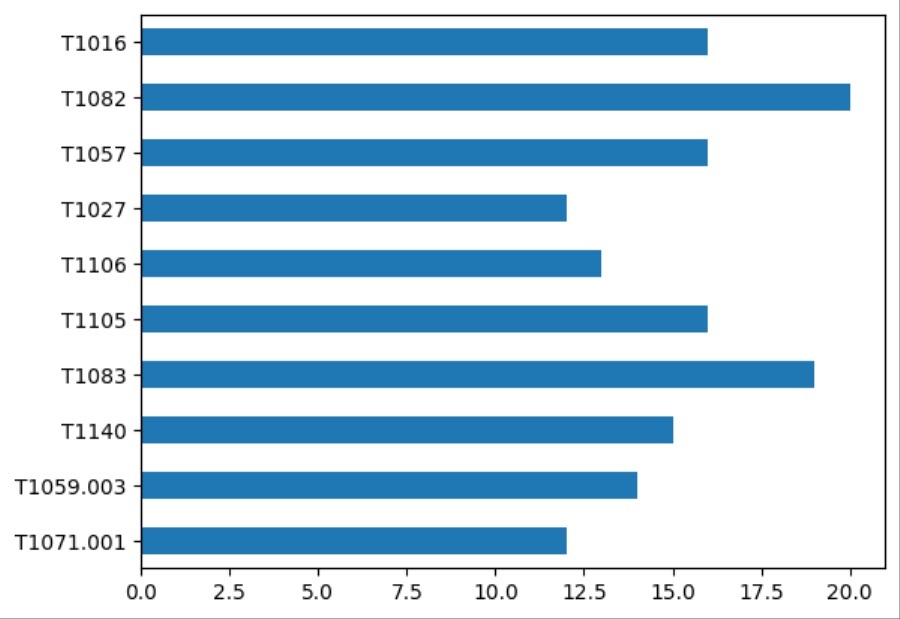
Going a step further, you can also limit your collection of TTPs to specific MISP events. MISP allows you to add tags to events that allow you to classify and categorize your events. For instance, you could have a tag for external threat intelligence reports, a tag for incidents your organization has faced in the past, or a tag for research you’re performing.
The code below limits the TTPs it aggregates and visualizes to those with the tag “software-research.” I created this custom tag to add data to MISP about threat actors and malware I was researching, including the TTPs they use. The code lets me see the common TTPs in this research data.
Python
TAG = "software-research"
# get all events in MISP instance
all = misp.search(controller="events")
# create dictionary containing MITRE ATT&CK TTPs mapped to a count
ttps = {
  "T1548" : 0,
  ...
  "T1220" : 0,
}

# loop through all events and increase count of a TTP in dictionary if an event has that TTP
for i in all:
    # check for a specific TAG
    for tag in i['Event']['Tag']:
        if tag['name'] == TAG:
            galaxies = i['Event']['Galaxy']
        else:
            continue
        for j in galaxies:
            if j['type'] == 'mitre-attack-pattern':
                for k in j['GalaxyCluster']:
                    ttp = k['meta']['external_id'][0]
                    if ttp in ttps:
                        ttps[ttp] += 1

# plotting data
ttps_data = pd.Series(data=ttps, index=list(ttps.keys()))
(ttps_data
    [lambda s: s>11]
    .plot.barh()
)
Summary
Congrats! You now know the basics of the MISP API and how to leverage it to get statistics about your MISP instance, search for attributes and events, and visualize the threat intelligence you’ve added to it. The MISP API is an incredibly powerful tool that you should invest time into learning by building your own simple Python scripts and automations.
If you were unable to follow along, don’t worry. I will add all these code examples to a Jupyter Notebook you can use. You can find it on my GitHub page, and I will write up how to use it in Python Threat Hunting Tools: Part 11 — A Jupyter Notebook for MISP.
The next installment in this series explores how to export attributes from your MISP instance as IOCs to use with your security solutions to detect and block the latest threats. You will see how to do this through the web interface and the MISP API. Stay tuned!
Discover more in the Threat Intelligence with MISP series!

Stay up-to-date whenever we release articles, tips, and guided tutorials. Don’t miss a thing and signup to get notified of new content.
Interesting in Learning More?
![]()
Learn the dark arts of red teaming
Check out these courses offered by Zero-Point Security. They will teach you all things red teaming from creating exploits, writing your own C2 framework, and emulating real-world threat actors.
If you want more of a challenge, take on one of their certification exams and land your next job in cyber:
![]()
Learn more cyber security skills
Check out The All-Access Membership Pass by TCM Academy. for courses on hacking/pentesting, malware analysis, digital forensics, programming/scripting, GRC, and more!
If you’re looking to level up your skills even more, have a go at one of their certifications: